Tuesday, September 17, 2013

Symfony 2 symblog tutorial errors

It seems that the Symfony 2 tutorial ("Symblog") is a little out of date. While going through it, I stumbled on some unexpected behaviour. There were exceptions getting thrown when the tutorial made no mention of them. This could be due to several behaviours being deprecated since 2.1; I was using 2.3.4.

So without further ado...

The errors and their fixes as you work through the tutorial

1) When creating a controller method for the Contact page, $form->bind($this->bindRequest($request) resulted in:

FatalErrorException: Error: Call to undefined method Symfony\Component\Form\Form::bindRequest() in /path/to/root/src/Blogger/BlogBundle/Controller/PageController.php line 31

I poked around at code that I already knew worked and found this alternative:
$form->bind($this->getRequest());

2) While editing src/Blogger/BlogBundle/Entity/EnquiryType.php, adding this line $metadata->addPropertyConstraint('body', new MaxLength(50)); in static function loadValidatorMetadata(ClassMetadata $metadata) resulted in an exception:

FatalErrorException: Error: Class 'Symfony\Component\Validator\Constraints\MaxLength' not found in /path/to/root/src/Blogger/BlogBundle/Entity/Enquiry.php line xx

I read elsewhere that MaxLength and MinLength are deprecated since Symfony 2.1, so you're better off declaring the above line as
$metadata->addPropertyConstraint('subject', new Length(array('max' => 50)));

Just make sure to add this to the top of the class: use Symfony\Component\Validator\Constraints\Length;

3)When told to add the following lines to src/Blogger/BlogBundle/Resources/config/config.yml

parameters: blogger_blog.comments.latest_comment_limit: 10
You will instead get an error along the lines of blogger_blog.comments.latest_comment_limit must be defined. Now, the solution is to either do this tutorial (http://symfony.com/doc/current/cookbook/bundles/extension.html), or do the shortcut, which I did (because lazy).

4) While trying to enable Assetic for BloggerBlogBundle, you are instructed to put it in app/config/config.yml. However, it doesn't take effect. Instead all sidebar.css-ing disappeared. This is because you should have put BloggerBlogBundle in app/config/config_dev.yml.

5) Yui Compressor jar file not found - Make sure that 1) you've put the jar file in app/Resources/java and that 2) the name of that jar file is the same as in config_dev.yml.

If there will be more, I will update this post. Happy coding!

Saturday, July 20, 2013

Symfony 1.4 error: Class 'BaseFormDoctrine' not found in (projectpath)/BaseAuthorForm.class.php

Blogging because I thought this error was funny!

Currently, I'm playing around with Symfony 1.4 (for particular reasons). I've gotten to the part where I can now generate modules so that CRUD forms will be auto-created for me. When I executed this command:

php symfony doctrine:generate-module --with-show --non-verbose-templates frontend author Author

I got this error:


PHP Fatal error:  Class 'BaseFormDoctrine' not found in (pathto project)/lib/plugins/sfDoctrinePlugin/test/functional/fixtures/lib/form/doctrine/base/BaseAuthorForm.class.php on line 14.


I searched around because I'm completely new to Symfony and am under a deadline. (Spending the weekend on this. Sigh...) Heard that there's a file called config_autoload.yml.php in cache/frontend/dev/config that maps out what file the key "BaseFormDoctrine" leads to. As it turned out, it led to lib/plugins/sfDoctrinePlugin/data/generator/sfDoctrineForm/default/template/sfDoctrineFormBaseTemplate.php.

So I looked at it. And guess what! The opening php tag in the file didn't begin with "<?php". It began with "[?php".

Changed that square bracket to "<" and I was back on the road.

Monday, June 17, 2013

Ruby on Rails (on Windows) - "ruby_check_sizeof_voidp is negative"

Today I installed Ruby on Rails on my Windows machine, but had to jump through a few hoops to get it done. The biggest stumbling block was that whenever I got down to executing "rails new myapp", I got a long error that started with

C:/Ruby193/bin/ruby.exe extconf.rb
creating Makefile

make
generating generator-i386-mingw32.def
compiling generator.c
In file included from c:/Ruby193/include/ruby-1.9.1/ruby.h:32:0,
                 from ../fbuffer/fbuffer.h:5,
                 from generator.c:1:
c:/Ruby193/include/ruby-1.9.1/ruby/ruby.h:109:14: error: size of array 'ruby_check_sizeof_voidp' is negative
In file included from c:/Ruby193/include/ruby-1.9.1/ruby.h:32:0,
                 from ../fbuffer/fbuffer.h:5,
                 from generator.c:1:


and ended with

make: *** [generator.o] Error 1

and some version of the message "make sure the json gem was installed correctly" and "log errors will be stored at C:\Ruby193\lib\ruby\gems\1.9.1\gems\json-1.8.0\ext\json\ext\generator\gem_make.out".

So I tried "gem install json -v '1.8.0'" (sometimes with "--platform=ruby") but I still received errors. Then I actually looked at gem_make.out and sow the following line: "c:/Ruby193/include/ruby-1.9.1/ruby/ruby.h:109:14: error: size of array 'ruby_check_sizeof_voidp' is negative".

Cue this StackOverflow post, and I realized that I did not install the correct Devkit. I so wanted to work with the latest release of everything that I ignored the "Which Development Kit?" section of this Ruby Installer for Windows page.

I reinstalled Devkit (following the instructions here) and actually created my new web app. Now, I have Ruby 1.9.3 working with Rails 3.2.13 and the tdm-32-4.5.2 version of DevKit installed.

Thursday, May 30, 2013

So... what are you supposed to do, really?

You know what would be really nice?

If a website promoting some product that purports to make my programming life easier would state what problem it solves. I don't mind searching for more information on a product and looking up word combinations I've never seen before, but, really, something like this would be nice: "Hey, remember when you tried to scale your app and you spent, like, a week wrangling everything into place? This product will let you do that in less time!"

/end_rant

Sunday, April 28, 2013

jQuery UI (1.9.2) dialog box did not have an image for its close button

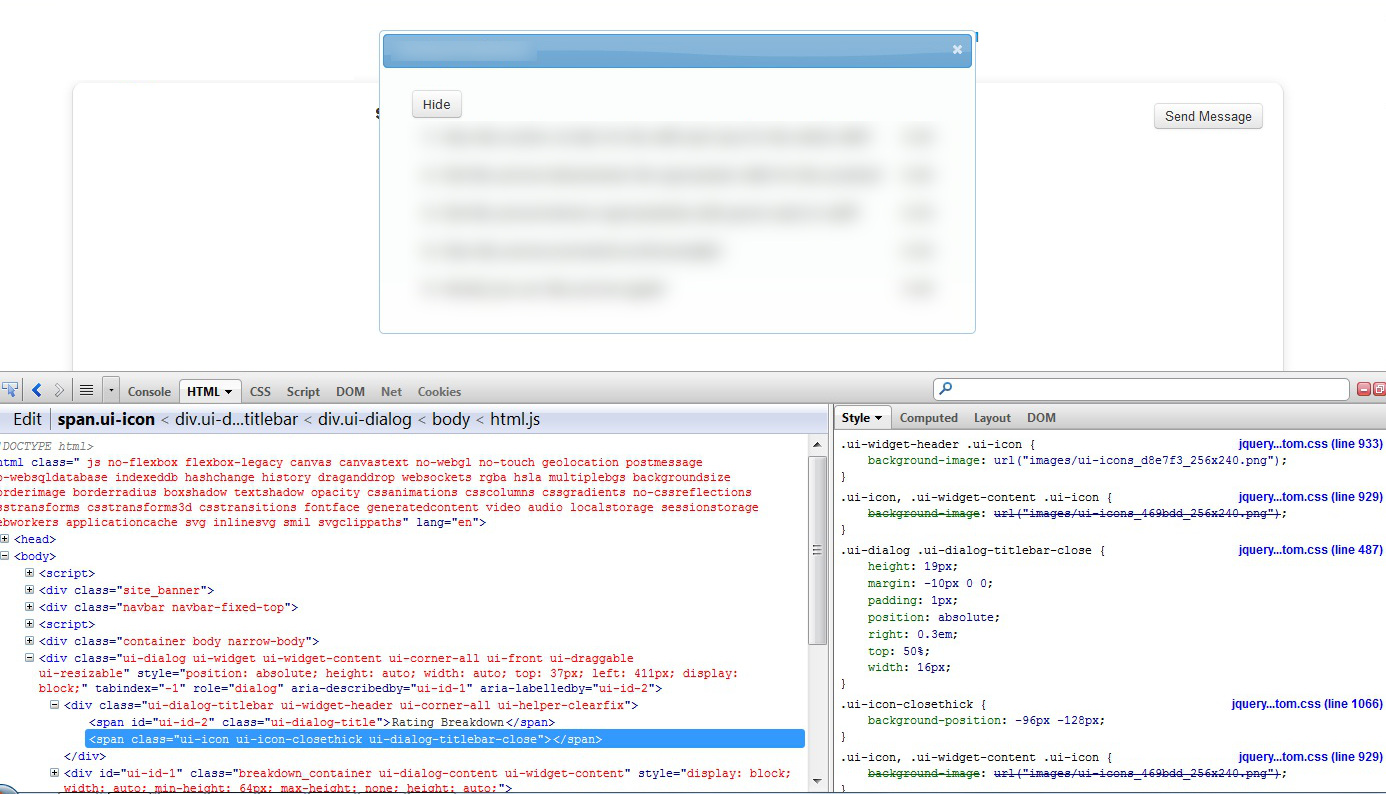
The title is pretty self-explanatory, but let me demonstrate. This was the dialog box that caused me a few hours of pain on Thursday and Friday:


Notice the "Hide" button? It's because I was so frustrated with the close button that I originally planned to make the contents of the dialog appear on the webpage itself, with an option for the user to hide on show the contents (with tacky buttons, imo).

Anyway,  I thought at first that maybe I did not have the image file for this jQuery-UI theme. I did. Perhaps they were not being loaded properly. They were. Then I remembered that a few months ago, I was working on another website with a working dialog box, so I took a look at and the code behind it.


The button was a span element! So I took a look at the old, working jQuery-UI file and the 1.9.2 version and guess what I found out: the new one uses the button element.


(I searched for "ui-dialog-titlebar-close" in the JS file to see where the button would be created and assigned that class.)

How to fix? Good ol' copy and paste.


By replacing the button element with the span element, I finally got an image for my dialog box close button, except it wasn't quite correct.


If you've downloaded and unzipped a jQuery-UI theme, you'll know that the all the icons for jQuery-UI stuffs (like calendar arrows and dropdown triangles) are just in one file.

In the above photo, notice how you can see the edges of the icons next to the "x" in the png file. This was an exciting find for me (!!) because I always wondered why the icons weren't stored as images by themselves.

So on Friday I learned that jQuery-UI selects its icons from one PNG file through margin, width, and height attributes. (Go try it out on Firebug!) I adjusted these attributes and ended up with a properly centred "x" icon.


A better look at the fixed up CSS:


I'm not actually sure if there was an easier way to fix my close button image problem. I'm sure changing to an older version of jQuery-UI would've been the correct approach, but, to be honest, a lot of things have been breaking left, right, and center depending on what version of jQuery I've loaded, and I didn't want to take the risk with this one.

Hope this helps somebody out there. Happy coding!

Saturday, April 6, 2013

Passing a PHP array to a Javascript Ajax call

Recently, I found myself making an Ajax call to a PHP function and needing more than just one piece of data back from it.

For those who don't know, a PHP function can "return" data to an Ajax call by echoing the data out. So, for example, given this Ajax call:

  $.ajax({
      type: "POST",
      url: 'http://www.domainname.com/module/controller/insert',
      data: { name: 'Donna Oberes', address: 'The Universe' }
    }).done(function(msg) {});

And given a function that inserts data into the database, returning/echoing data would look like:

  public function insert($name, $address)
  {
    $new_id = 
      $this->people_model->insert(array('name' => $name, 'address' => $address));
    
    // Return the ID by echoing
    echo $new_id;
  }

The calling Ajax function will 'catch' $new_id with the variable msg and do whatever it wants with it.

But how about if I need more than just the new_id? Say, for example, I need the new id and a nicely formatted date of when this new id was created. I have to return these through an array, but the key is to return the array json_encoded. So I should do this:

 
  public function insert($name, $address)
  {
    $new_id = 
    $this->people_model->insert(array('name' => $name, 'address' => $address));
    $data = array('id' => $id, 'date' => 'April 6, 2013'); 
    echo json_encode($data).
  }

And then in the ajax call that catches the printout, msg will catch the array, but the array has to go through $.parseJSON so that it's usable as a JavaScript array.

  $.ajax({
      type: "POST",
      url: 'http://domainname.com/module/controller/insert',
      data: { name: 'Donna Oberes', address: 'The Universe' }
    }).done(function(msg) {
      var obj = $.parseJSON(msg);
      // Print out
      $('#student_list').append("New student ID " + obj.id + " added on " + obj.date);
    });

Thursday, March 21, 2013

CodeIgniter-Bonfire and Images

Here is simple code for displaying images in an MVC framework like CodeIgniter-Bonfire. This entry assumes that one already has an understanding of how such a framework works.

The Database Table

Ideally, your database table would contain the following columns with the following types: id (int(11)), title (varchar(255)), mimetype (varchar(255)), filesize (int(11)), content (longblob).

The id, title, and filesize columns are self-explanatory. The mimetype is information you need later on for rendering the photo and can be obtained as you're uploading the photo. (The filesize is also something you can get when you're uploading the photo.) The content is the image itself in a binary format.

The View

At the very least, the view will have a form with one input element of type file so that you can upload the photo. Once you submit the form, you can validate the file size and the extension.

Sample form:

< form action="http://some.website.com/images/create" enctype="multipart/form-data"> < /form>

< input id="file" name="file" type="file" />

< input name="save" type="submit" value="Upload" />


The enctype must be 'multipart/form-data.' Otherwise, the $_FILES variable will not be created when you submit the form. $_FILES will contain all the file information you need. If the input box is named 'file', you can get the uploaded file's size through $_FILES['file']['size'].

Sample controller:
class images extends Front_Controller
{
  public function create()
  {
    if ($_FILES['file']['size'] > 0)
    {
      // Get the file info
      $name = $_FILES['file']['name'];
      $size = $_FILES['file']['size'];
      $type = $_FILES['file']['type'];
      $tmpname = $_FILES['file']['tmp_name'];
      
      // Grab the contents of the photo
      $fp = fopen($tmpname, 'r');
      $content = fread($fp, filesize($tmpname));
      fclose($fp);

      // Load your model, if your constructor doesn't 
      //do it for you
      $this->load->model('images/Images_model', 
      'images_model');

      $data['title']        = $name;
      $data['mimetype']     = $type;
      $data['filesize']     = $size;
      $data['content']      = $content;

      // Save the image
      $insert_id = $this->images_model->insert($data);

      // Now go print out a success message if $insert_id 
      // is an integer,or an error message if it's false
    }
  }
}

Displaying the image 
 
When you want to display the image, the img tag's src should point to another function in your images controller. This function retrieves the images' content from the databases and prints it out with the appropriate headers.

Sample view

Here is a photo: 
< img src="http://some.website.com/images/fetch/8" alt='a picture' />

The controller function will look like the following (put this below the create() function):
public function fetch($id)
{
  $this->load->model('images/Images_model', 
  'images_model');
  $image = $this->images_model->find($id);
  ob_clean();
  header("Content-type: ".$image->mimetype);
  echo $photo->content;
}

And that's it! The image will be echoed out to the browser as an actual image (as opposed to the garbage it looks like in the database) because of the Content-type. Your browser knows how to interpret the following data.